Why Choose Homemade Coconut Whipped Cream?
Tired of settling for store-bought, often sugar-laden, or chemically stabilized toppings? Imagine a luscious, dairy-free whipped cream that's not only incredibly light and fluffy but also naturally sweetened and made right in your own kitchen. That's the magic of **homemade coconut whipped cream**. This versatile vegan topping is a game-changer for anyone seeking a delicious alternative to traditional dairy whipped cream, whether due to dietary restrictions, health preferences, or simply a love for all things coconut.
Making your own offers several compelling advantages. You gain complete control over the ingredients, ensuring it's free from refined sugars, artificial flavors, and unwanted additives. It's often more cost-effective than specialty vegan whipped toppings, and the satisfaction of creating something so delightful from scratch is unparalleled. Beyond its creamy texture and subtle coconut flavor, it’s a remarkably reliable option that holds its shape beautifully, making it perfect for adorning everything from fresh berries to elaborate holiday pies. Plus, it’s naturally vegan, paleo-friendly, and can even be made Whole30-compliant if unsweetened.
The Magic Behind Dairy-Free Whipping
The secret to achieving that coveted light and airy consistency lies in the unique properties of full-fat coconut cream. When chilled, the rich coconut fat solidifies and separates from the watery liquid. This hardened, concentrated cream, when vigorously beaten, incorporates air, transforming into a billowy, stable foam much like heavy dairy cream. This natural process allows for a truly clean-label topping that doesn't rely on gums or emulsifiers to achieve its dreamy texture. It’s a simple yet brilliant culinary hack that opens up a world of dairy-free dessert possibilities.
Essential Ingredients for Fluffy Perfection
Creating the perfect batch of **homemade coconut whipped cream** requires just a handful of simple pantry staples. The quality and type of each ingredient play a crucial role in the final texture and flavor, so choosing wisely is key to success.
The Star: Full-Fat Coconut Cream
This is, without a doubt, the most critical ingredient. Do not confuse full-fat coconut cream with coconut milk (even full-fat coconut milk) or "cream of coconut." While some high-quality, full-fat coconut milk cans *can* work if they separate very well, dedicated coconut cream typically yields the best results.
* **Look for:** Unsweetened, full-fat coconut cream. Many brands specifically label "coconut cream."
* **Avoid:** "Lite" or "reduced-fat" versions, as they won't contain enough fat to whip properly. Also, steer clear of cans with added gums (like guar gum or xanthan gum) or emulsifiers. These additives can prevent the cream from hardening and separating effectively, leading to a soupy or gritty texture. The fewer ingredients on the label, the better – ideally, just coconut extract and water.
* **Why it matters:** The high fat content is what allows the cream to solidify when chilled and then whip into stiff peaks. Gums interfere with this natural separation and whipping process.
Sweeteners and Flavor Enhancers
While the coconut cream provides a wonderful base, a touch of sweetness and flavor depth elevates it to perfection.
* **Maple Syrup:** Our preferred refined sugar-free sweetener. It lends a subtle warmth and richness without overpowering the coconut. Start with a small amount and adjust to your taste.
* **Vanilla Extract:** A non-negotiable for most whipped creams, vanilla adds a classic warmth and depth that complements the coconut beautifully.
* **Fine Sea Salt:** Just a tiny pinch makes a huge difference! Salt enhances the perceived sweetness and balances the overall flavor, preventing it from tasting flat.
* **Other Sweetener Options:**
* **Honey:** Another natural, refined sugar-free option (though not vegan).
* **Monk Fruit Sweetener or Erythritol:** For a truly sugar-free alternative.
* **Powdered Sugar:** If you're not concerned about refined sugar, a tablespoon or two of powdered sugar (confectioners' sugar) can actually help stabilize the whipped cream, making it hold its shape even better.
* **Flavor Variations:** Get creative! A dash of almond extract, a sprinkle of cinnamon, lemon or orange zest, or even a tablespoon of unsweetened cocoa powder can transform your whipped cream for different dessert pairings.
Your Step-by-Step Guide to Perfect Homemade Coconut Whipped Cream
Achieving that dreamy, fluffy texture is surprisingly simple, provided you follow a few key steps. Get ready to whip up the best **homemade coconut whipped cream** you've ever tasted!
Preparation is Key: Chill Your Cream
This is the single most important step. Without proper chilling, your coconut cream won't separate effectively, and you'll end up with a watery mess instead of fluffy peaks.
1. **Refrigerate the Can:** Place your can of full-fat coconut cream (unopened and undisturbed) in the refrigerator for at least 2 hours. For best results, chill it overnight or for 8-12 hours. The longer it chills, the firmer the cream will become.
2. **Avoid Shaking:** Do not shake the can after placing it in the fridge! Shaking will mix the cream and liquid back together, undoing all your chilling efforts.
3. **Chill Your Tools (Optional but Recommended):** For an extra boost, place your mixing bowl (preferably a metal one) and beaters in the freezer for 10-15 minutes before you start. Cold tools help the cream whip faster and more effectively.
Separate and Scoop
Once thoroughly chilled, you're ready to extract the good stuff.
1. **Open Carefully:** Without shaking, carefully open the chilled can. You should see a thick, opaque white layer of hardened cream on top, with a clearer, watery liquid at the bottom.
2. **Scoop the Cream:** Using a spoon or spatula, gently scoop out only the thick, hardened coconut cream into your cold mixing bowl.
3. **Reserve the Liquid:** The liquid at the bottom of the can is coconut water. Don't discard it! You can save it for smoothies, other recipes, or use a small splash to adjust the consistency of your whipped cream if it becomes too thick.
Whip It Good!
Now for the fun part – transforming that solid cream into a cloud of deliciousness.
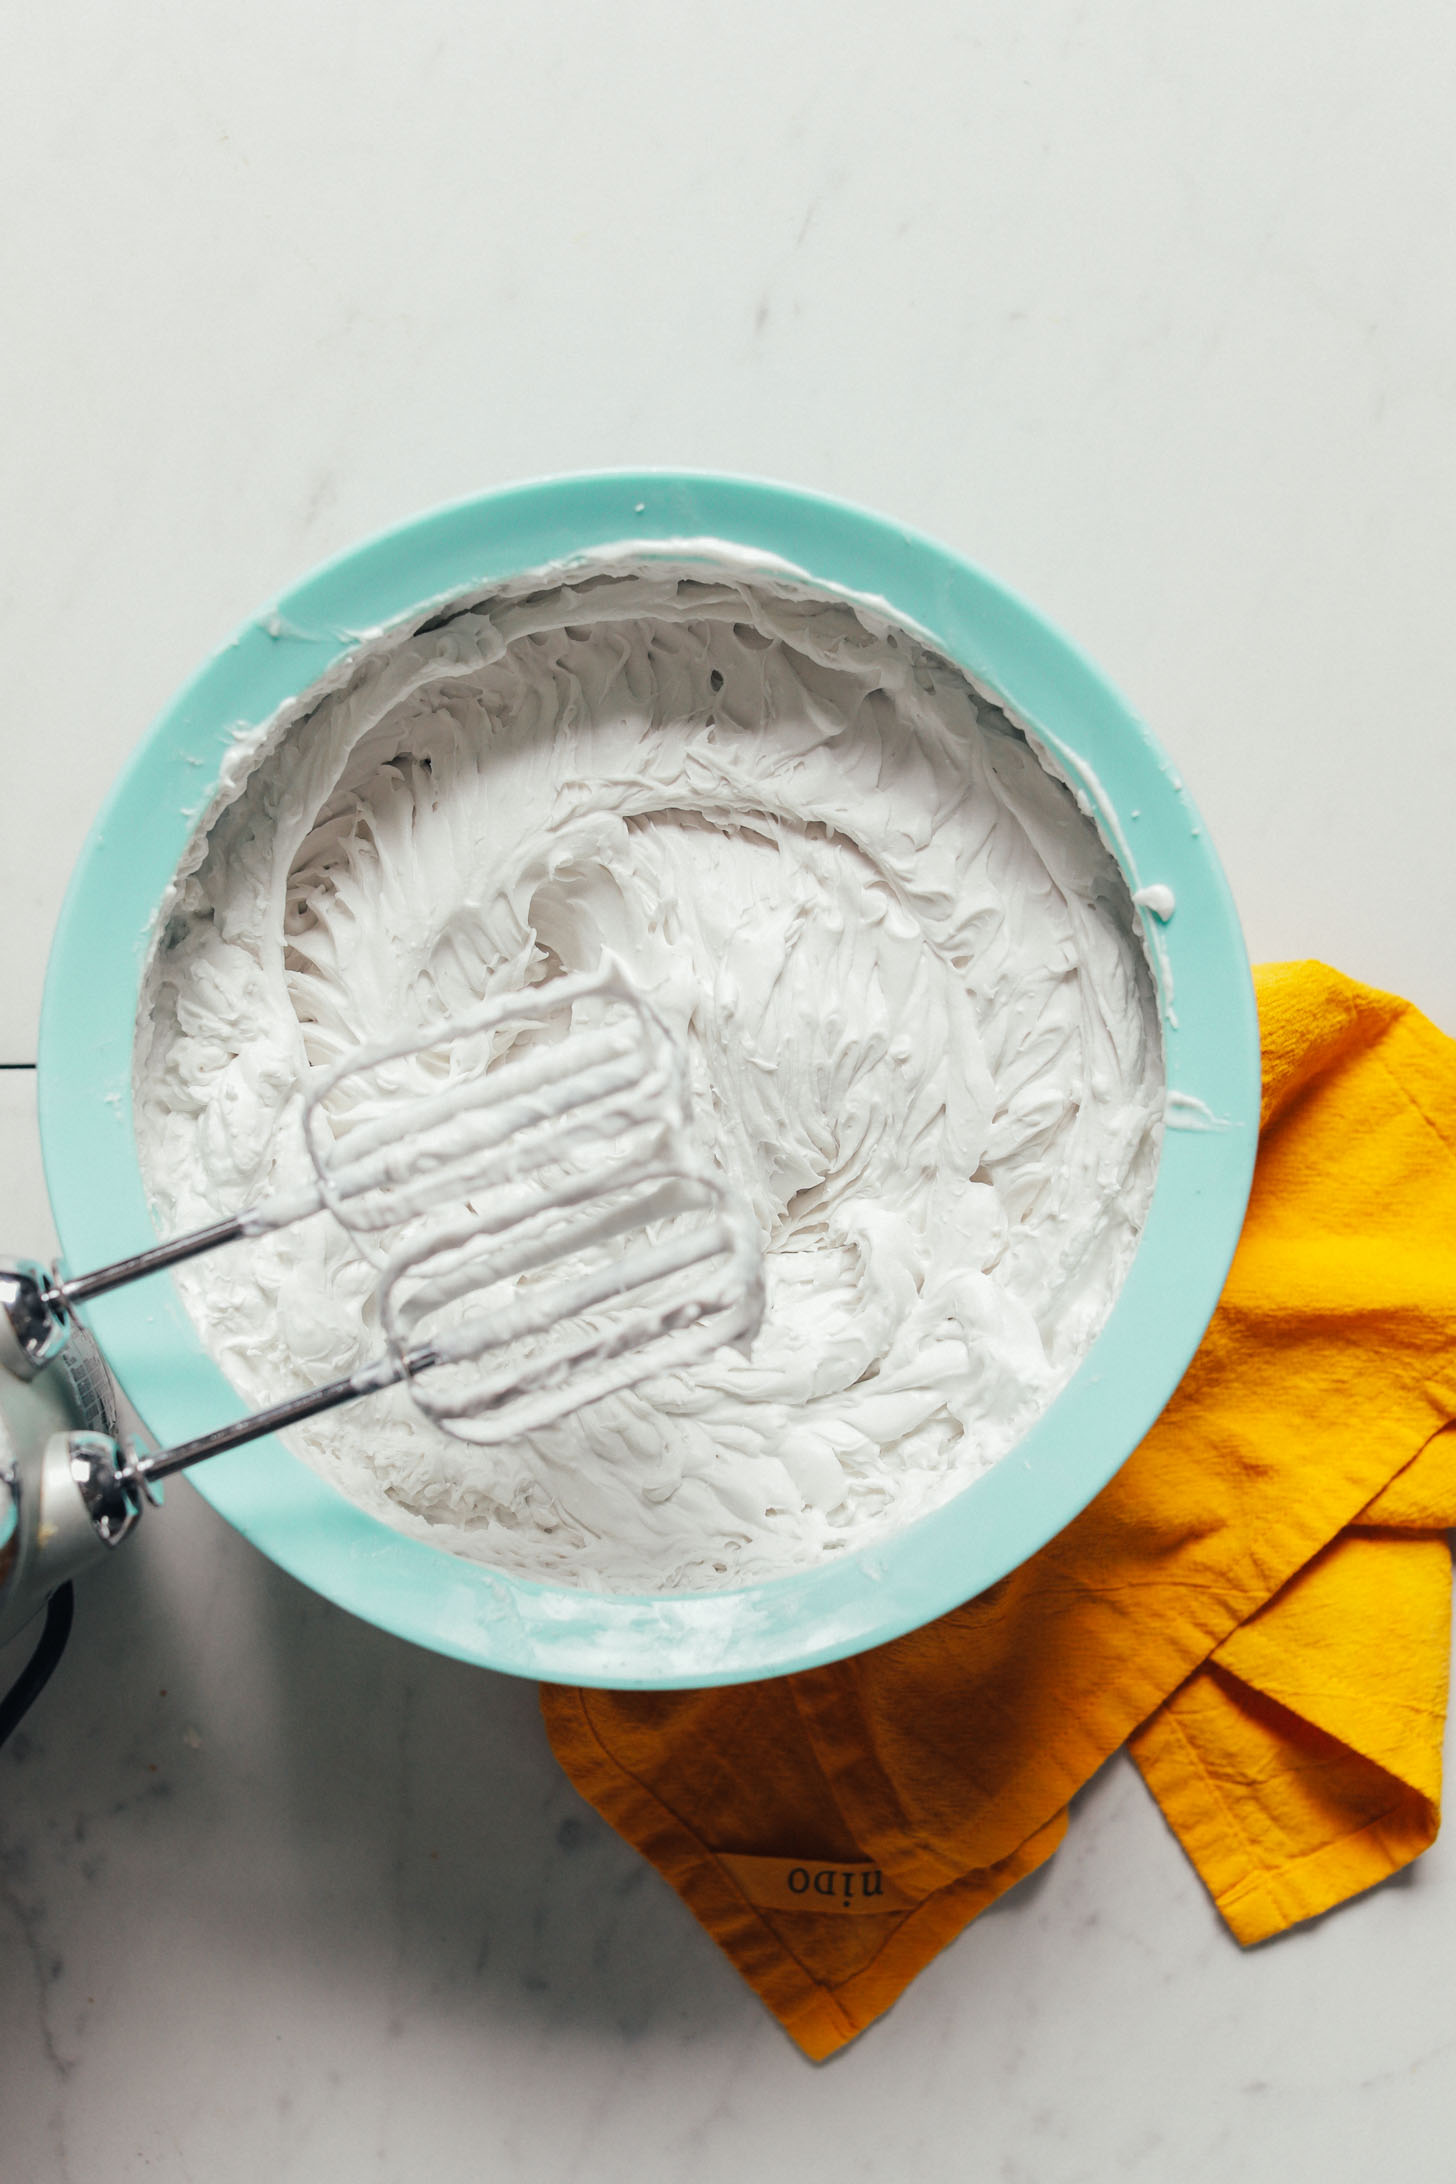
1. **Initial Beat:** Using electric hand beaters or a stand mixer with the whisk attachment, start beating the hardened coconut cream on medium speed. It will initially look crumbly or lumpy, but keep going.
2. **Smooth and Creamy:** Continue beating until the cream becomes smooth and creamy, with no lumps remaining. This usually takes 1-2 minutes.
3. **Add Flavorings:** Once smooth, add your maple syrup (or other sweetener), vanilla extract, and a tiny pinch of fine sea salt.
4. **Whip to Fluffiness:** Increase the speed to high and continue beating. Watch as the cream transforms, incorporating air and becoming light, airy, and fluffy. Beat until it reaches your desired consistency – soft peaks for a delicate topping, or stiffer peaks for piping. This typically takes another 2-4 minutes, depending on your mixer and the cream's temperature.
5. **Adjust Consistency:** If your whipped cream feels too thick or stiff, add a very small splash (1 teaspoon at a time) of the reserved coconut liquid from the can, beating briefly after each addition until you reach the perfect texture.
That's it! Your perfect **homemade coconut whipped cream** is ready to impress. Spoon it generously onto
chocolate chia pudding, swirl it into hot cocoa, dollop it over fresh fruit, or use it to elevate any dessert that calls for a dreamy topping.
Troubleshooting: Why Your Coconut Whipped Cream Isn't Whipping Up
While making **homemade coconut whipped cream** is generally straightforward, sometimes things don't go as planned. If you find yourself with a soupy, gritty, or simply un-whippable batch, don't despair! Here are the most common culprits and how to avoid them. For more in-depth solutions, check out our guide on
Say Goodbye to Runny Coconut Whipped Cream: Expert Tips.
Common Pitfalls and How to Avoid Them
- You Used the Wrong Product:
- **Mistake:** Using coconut milk instead of coconut cream, or a "lite" version. Coconut milk is much more liquidy and often won't separate properly. Lite versions lack the necessary fat content.
- **Solution:** Always use full-fat coconut cream (or a known reliable brand of full-fat coconut milk that clearly separates well). Check the label carefully.
- The Can Had Emulsifiers or Gums:
- **Mistake:** Some brands add guar gum, xanthan gum, or other emulsifiers to keep the cream and liquid from separating. This is counterproductive for whipping.
- **Solution:** Read the ingredient list! Opt for brands that list only coconut extract and water (or similar simple ingredients).
- It Wasn't Chilled Enough:
- **Mistake:** If the cream is still soft or somewhat liquidy, it won't whip into firm peaks. The fat needs to be solidified.
- **Solution:** Chill the can for a minimum of 2 hours, but ideally overnight (8-12 hours). If your cream is still soft after scooping, pop the bowl of cream back into the fridge for another hour or two.
- Your Bowl or Beaters Were Warm:
- **Mistake:** Heat can cause the coconut fat to soften, making it difficult to whip.
- **Solution:** Use a thoroughly chilled mixing bowl (metal is best) and cold beaters. A quick 10-15 minutes in the freezer before starting can make a big difference.
- Over-Whipping:
- **Mistake:** While less common than under-whipping, over-whipping coconut cream can sometimes cause it to become grainy or even separate.
- **Solution:** Watch carefully and stop beating once it reaches your desired fluffy consistency. If it becomes slightly grainy, sometimes adding a tiny splash of the reserved coconut liquid and gently folding can help smooth it out.
Tips for Serving and Storing Your Homemade Coconut Whipped Cream
Once you've mastered the art of making perfect **homemade coconut whipped cream**, you'll want to enjoy every last spoonful. Here are some tips to get the most out of your dairy-free delight.
Creative Serving Ideas
The versatility of this whipped cream is truly impressive.
* **Classic Desserts:** Dollop generously on pies, tarts, fruit crumbles, and cakes.
* **Fruit Paradise:** A simple bowl of fresh berries (strawberries, blueberries, raspberries) or sliced peaches becomes an elegant dessert with a dollop of coconut whipped cream.
* **Beverage Bliss:** Swirl into hot chocolate, coffee, or milkshakes for a creamy, dairy-free upgrade.
* **Breakfast & Brunch:** Elevate pancakes, waffles, or French toast. Add a spoonful to your morning oatmeal or yogurt parfait.
* **Healthy Indulgences:** Pair with dark chocolate, homemade pudding, or serve alongside baked apples.
Storage Best Practices
* **Refrigeration:** Store any leftover coconut whipped cream in an airtight container in the refrigerator for up to 3-5 days.
* **Re-Fluffing:** Over time, it may lose some of its initial fluffiness and firm up in the fridge. Before serving again, give it a quick whisk with a fork or an electric hand mixer for 30 seconds to re-incorporate air and restore its creamy texture. You might need to add another tiny splash of reserved coconut liquid if it's too stiff.
* **Freezing:** While technically possible, freezing is generally not recommended as it can alter the texture, making it more watery or grainy upon thawing. It's best enjoyed fresh!
Making your own **homemade coconut whipped cream** is a truly rewarding experience. With minimal effort and just a few key tips, you can consistently achieve a perfectly fluffy, dairy-free topping that rivals its traditional counterpart in every way. Enjoy experimenting with flavors and adorning your favorite treats with this delightful, guilt-free indulgence!